
DNS-based Authentication of Named Entities (DANE) with TLSA is an incredible evolution in the security of web services. The modern way of encrypting a web service is with Transport Layer Security (TLS) like what is  commonly used in HTTPS. Each side of the connection generates and uses a public/private key pair. One side can encrypt data with the other side’s public key, so only the private key can read it. This works great, but that alone does not provide the user with a way of knowing if the server’s key pair actually belongs to the server. It could have been provided by a snooping third party. The standard solution to this problem is having the certificate signed by a trusted Certificate Authority (CA). All CAs have strict operating requirements which usually prevent them from issuing signed certificates to anyone other than the party responsible for the domain. In a perfect world, this would be more than enough. In the real world, some CAs have been breached and a method of augmenting or replacing CAs has been devised.
This is where DANE with TLSA comes in. TLSA provides a standard way of distributing the hash of a server’s public key with a DNS Resource Record (RR). One fun fact from the standards document: “‘TLSA’ does not stand for anything; it is just the name of the RR type.” With it, any device can verify that a public/private key pair is indeed the certificate the administrators of that particular server wish to use. It is unrealistic to abruptly replace the use of CAs with TLSA though… after all, most modern web browsers will warn users if the website they visit uses a self-signed key instead of one from a valid CA. For forward-thinking web hosts, a hybrid approach might be best. Get a key pair signed by a recognized CA, but also use TLSA to protect against malicious CAs.
A favorite CA of mine is Let’s Encrypt, which I’ve written about before. Their mission is to reduce the barriers to encrypting every website by providing free certificates. They also provide a tool to automate the process of certificate renewal, but that tool generates a whole new key pair each time. This complicates a TLSA setup, because DNS records need to be updated in advance of a key pair change.
The anatomy of a TLSA record
Like many Internet standards, TLSA records are very simple, but not necessarily easy. The TLSA RR for a service at example.com will be published at _<portnumber>._<protocol>.example.com. and have these additional main components:
- Certificate usage
This determines which feature of the certificate the TLSA record is supposed to match against. It can be0for “CA restraint,”1for “Service certificate restraint,”2for “Trust anchor assertion,” or3for Domain issued certificate) - Selector
The choice is between0to match against the whole certificate or1to match against just the public key. - Matching type
This is either0to use the use the raw certificate,1to use the sha256 hash of the certificate, or2to use the sha512 has of the certificate. - Certificate association data
This is whatever data has been described by the three previous values.
For our purposes, we will use certificate usage 3 (Domain issued certificate), selector 1 (public key only), and matching type 1 (sha256 hash). You can read more about the meaning of those values in the RFC if you wish. These values will allow us to make a TLSA record that matches against the public key associated with the persistent key signing request. We could match against Let’s Encrypt’s signing certificate, but they might switch that at any time without warning. If they do switch it, some of your web service’s visitors would be unable to connect to your service.
An example of a TLSA record for the IETF (shamelessly copied from the Wikipedia) looks like this:
_443._tcp.www.ietf.org. TLSA 3 1 1 0C72AC70B745AC19998811B131D662C9AC69DBDBE7CB23E5B514B56664C5D3D6
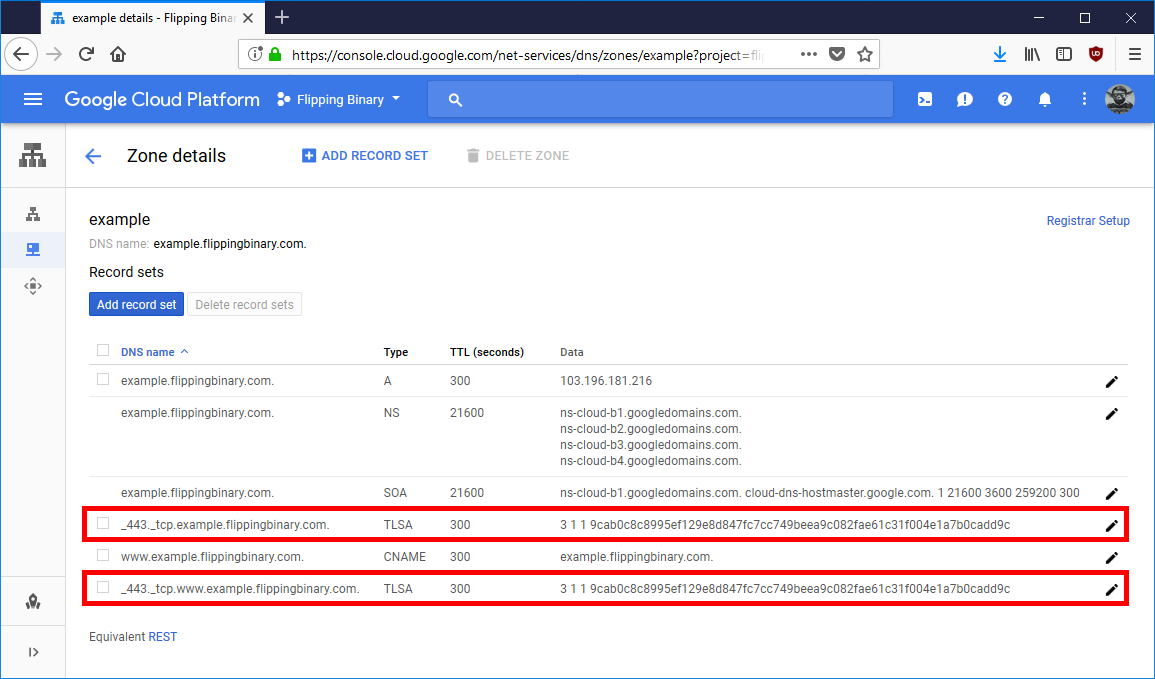 If you have a managed DNS provider, all you need is the
 _443._tcp. part (use it like a hostname) along with the part after TLSA (that’s the record). Take a look at this screenshot to see what a TLSA record looks like in Google DNS. Obviously yours will be different, but we’ll look at generating them later. First we need to see what it takes to get Let’s Encrypt to reuse a key pair.
Convincing Let’s Encrypt to reuse a key pair
This is actually quite simple. Let’s Encrypt has a standard command line tool called Certbot which will automatically generate certificates and handle key signing for you. It also has a command line option --csr for reusing a certificate request (which is linked to a single keypair). Unfortunately, that option can only be used in “certonly” mode.
  --csr CSR             Path to a Certificate Signing Request (CSR) in DER or
                        PEM format. Currently --csr only works with the

                        'certonly' subcommand. (default: None)
This is a problem because certificate renewals are normally handled by the command certbot renew and is called by the crontab. Using --csr breaks this feature. If you want to use persistent key pairs, you’ll have to organize and manage the renewal of certificates on your own. I’ve created a set of bash scripts which do this in a four-step process, and you can take a look at them on Github. I’ll summarize the main commands here (don’t forget to replace “example.com” with your real domain):
- Generate the key pair and certificate signing request. This creates request.csr and privkey.pem
openssl req \
  -config <(printf "[req]\ndistinguished_name=req_dn\n[req_dn]\ncommonName=example.com\n[san]\nsubjectAltName=DNS:example.com,DNS:www.example.com") \
  -new -nodes -subj '/' -reqexts SAN \
  -out request.csr \
  -keyout privkey.pem \
  -newkey rsa:4096 \
  -outform DER
- Request a signed certificate from Let’s Encrypt. This uses request.csr and creates fullchain.pem, chain.pem, and cert.pem. It also expects your
example.comdomain to be served at/var/www/htmlso change it if you use a different webroot.certbot certonly \ --webroot \ --csr request.csr \ --preferred-challenges http-01 \ -w /var/www/html \ --fullchain-path fullchain.pem \ --chain-path chain.pem \ --cert-path cert.pem
- Calculate the hash for this certificate and publish it to the appropriate DNS record name. The command below prints the record to the terminal. You must update your DNS to include both your current TLSA record (if any) and your new one. Otherwise, there will be a period of time when visitors may receive an error because they received a certificate which doesn’t match the TLSA record.
cat <<EOF _443._tcp.example.com. IN TLSA 3 1 1 $(openssl x509 -in cert.pem -noout -pubkey | openssl pkey -pubin -outform DER | openssl dgst -sha256 -binary | hexdump -ve '/1 "%02x"') EOF - Install the newly signed certificate and reload your web service. Unfortunately, there isn’t a one-size-fits-all snippet I can provide you, but be sure to wait until the new TLSA record propogates through your network. If you have been using certbot, you could point the symlinks in /etc/letsencrypt/live/example.com to the files you created in the previous three steps. Otherwise, configure your web server to read from their current location.
Automate it
At this point, if you followed the steps in the previous section, you should have a valid certificate to use with Postfix, Apache2, or Nginx but it will expire in three months unless you renew it. If you don’t want to have to update your TLSA record with your DNS provider at that point, you can renew using your existing key pair by repeating steps 2 through 4. When you decide you want to regenerate they key pair (for whatever reason) you can repeat steps 1 through 3 and publish the new TLSA record along with the old one. Then wait about two times the record’s TTL value before completing step 4. If you aren’t sure what your record’s TTL value is, just wait two days. That should be safe enough.