Generating reusable CSRs for Let’s Encrypt with TLSA

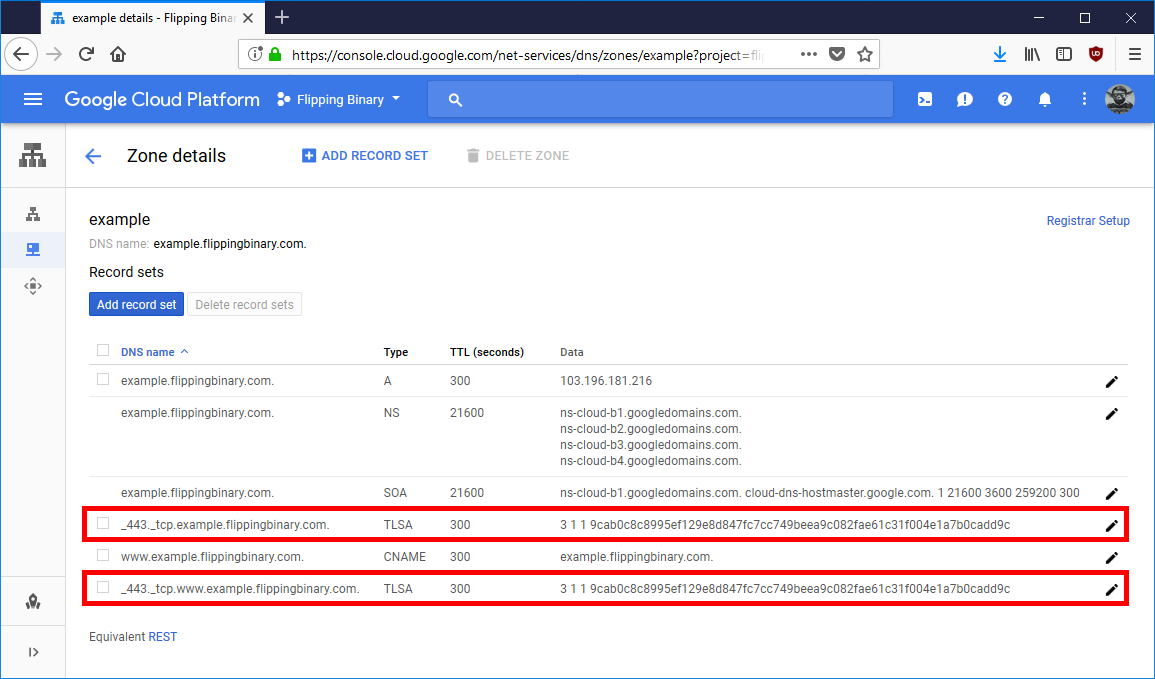
Let’s Encrypt’s standard ACME client, Certbot, allows you to reuse Certificate Signing Requests (CSRs). This is helpful because then you can keep a consistent TLSA record like I talked about in a previous article. DANE with TLSA is becoming extremely popular for authenticating encrypted email services, but they can be written for any TLS service so clients can authenticate the server. CSRs can be generated in a Linux terminal with OpenSSL, which is standard in many distributions of Linux. I wrote a set of scripts which automate the process of generating reusable CSRs, requesting key signing from Let’s Encrypt, calculating the hash of the public key, and creating a symbolic link in a standard location for these certificates. This article focuses on the first script in the series: letsencrypt-generate

Configuration

The first thing each of these scripts does is set up an environment with directory locations and file names. The MAIN_DIR is the first one to get defined because all the other paths are relative to it. The default location is /etc/ssl/letsencrypt. I wanted a safe default, so this places the files in a directory which is unlikely to be disturbed. On my own servers, I actually change this to /etc/letsencrypt because the scripts use subdirectory names which mirror what certbot uses, but the file names of the actual keyfiles are different. The only conflict is with the names of the symbolic links. This set of scripts names the symbolic links the same way that certbot does. That isn’t actually a problem because there really should be only one live certificate for each primary domain name. You can have multiple valid certificates for one domain name, but only one should be considered “live.”

MAIN_DIR=/etc/ssl/letsencrypt

The very next step is to load in the defaults file, if it exists. I added this to make it easier to change the few settings which are duplicated across this set of scripts, like MAIN_DIR. Having that one central location to edit settings just reduces the odds of forgetting to update something (like email address!).

[ -f /etc/default/letsencrypt-tlsa ] && . /etc/default/letsencrypt-tlsa

Input domain names

Now that general settings are out of the way, the script checks to see if you entered a domain name on the command line when you called the script. This particular script needs every Fully Qualified Domain Name (FQDN) which you wish to name in the certificate, starting with the primary domain name. The other scripts don’t strictly need you to name each one, but the primary domain name must be consistent because that’s what it uses to name and locate the certificates.

if [ "$#" -lt 1 ]
then
echo "Usage: $0 domain [space-separated list of alternate domains]" >&2
exit 1
fi

Environment

These scripts use the current system time to create a unique name for each certificate. This prevents file name conflicts even if the scripts share certbot’s namespace.

DATE=$(date +%Y%m%d%H%M%S)

OpenSSL expects alternate names to be specified with a comma separated list of “DNS:” followed by the FQDN. For example: DNS:example.com,DNS:www.example.com. This script creates a environment variable holding the first named domain name with the “DNS:” prefix, and a loop down below will append the rest of the FQDNs.

DOMAINS="DNS:$1"

The COMMON_NAME environment variable holds the first named FQDN for convenience. It is used to name directories and keep CSRs separated from each other.

COMMON_NAME="$1"

Each type of certificate gets its own subdirectory, so these environment variables name the locations where it will place these files.

CSR_DIR=${MAIN_DIR}/csr/${COMMON_NAME}
PRIVKEY_DIR=${MAIN_DIR}/keys/${COMMON_NAME}

This script creates both a CSR and a private key, so they need unique file names, which are generated using the time stamp.

CSR_PATH="${CSR_DIR}/csr-${DATE}.der"
PRIVKEY_PATH="${PRIVKEY_DIR}/privkey-${DATE}.pem"

Now the script appends each alternate FQDN to the list of names for OpenSSL. This is done with a simple BASH loop.

shift
for x in "$@"
do
DOMAINS="$DOMAINS,DNS:$x"
done

A few directories need to exist so OpenSSL can put files there. These directories are created with the -p option to create parent directories and silence errors about existing directories since this may not be the first time the user runs this script. The private key directory is also set to more restrictive permissions.

mkdir -p ${CSR_DIR}
mkdir -p ${PRIVKEY_DIR}
chmod 700 ${PRIVKEY_DIR}

OpenSSL magic

Here is the meat of the script. I’ll break it out into each option to discuss what is happening. Each of these lines end with a backslash character to tell BASH that the line is not over. You can, of course, delete the backslash and put all these lines together in one great big line if you want. I chose to split it apart for readability, both in the script and in the documentation.

OpenSSL is called with the req command, which tells OpenSSL to perform CSR-related actions.

openssl req \

This long beast of a line is what I used to eliminate the need for an OpenSSL configuration file. Normally the -config option is used to specify the file OpenSSL should use to define its behavior, instead we’re using a little BASH-magic to put those options in the command line.

-config <(printf "[req]\ndistinguished_name=req_dn\n[req_dn]\ncommonName=${COMMON_NAME}\n[san]\nsubjectAltName=${DOMAINS}") \

We’re generating a new key pair specifically for this CSR, so specify that on the command line.

-new \

The output of OpenSSL does not need to be encrypted, so we’re disabling that.

-nodes \

Subject should be blank to prevent errors, so we’ll specify a single forward slash for that.

-subj '/' \

OpenSSL needs to be made aware of the configuration option for alternate domain names, so this option does that.

-reqexts san \

The CSR will be saved in the location specified by the -out option.

-out "${CSR_PATH}" \

The private key will be saved in the location specified by the -keyout option. This should be a directory which is not world-readable. The script made sure of that earlier.

-keyout "${PRIVKEY_PATH}" \

Some people debate about the effectiveness of 4096 bit keys over Certbot’s default of 2048, but I prefer the higher bit count. All this means is it takes far more computing power to crack the key. It’s already cost-prohibitive to crack a 2048 bit key, but the cost of computing keeps dropping and I’d rather be prepared for the future. If you want, change this back to 2048. You’ll save a little compute time.

-newkey rsa:4096 \

Certbot seems to be switching over to DER format instead of PEM format for their CSRs, but either one should work. I just use DER here.

-outform DER

Conclusion

That’s all there is to the script. If it executes successfully, you should have a shiny new CSR and private key which are ready to be signed in the next step. These files can be saved and reused each time you renew your certificate so you don’t have to update your TLSA records whenever your certificate expires.


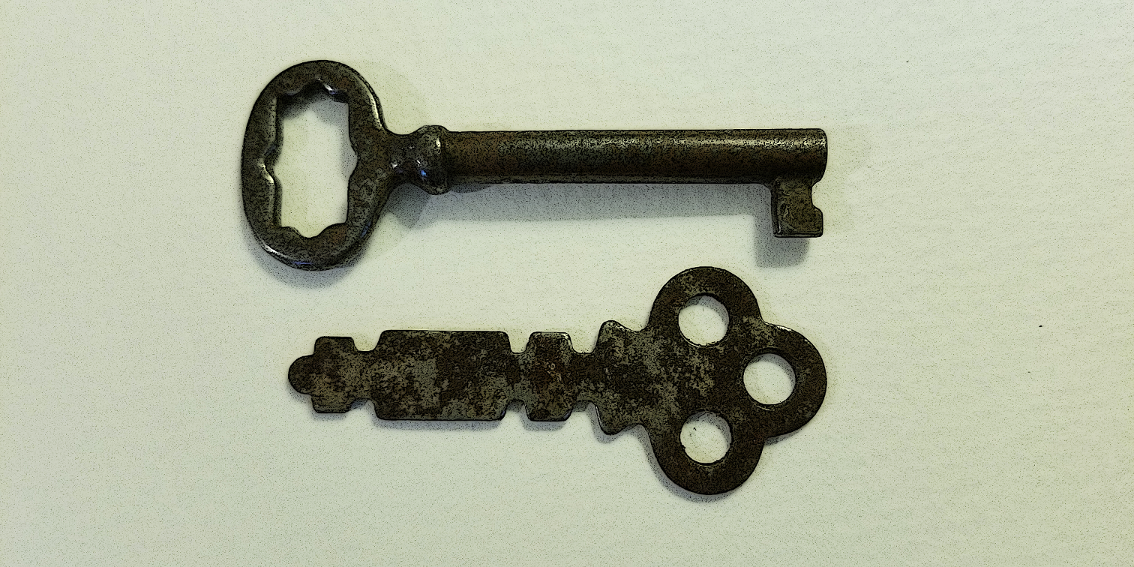
Featured image by Wikipedia user PierreSelim

I hope this helps you too. If it does, please share it.
Share

TLSA and DANE-EE with Let’s Encrypt certificates

DNS-based Authentication of Named Entities (DANE) with TLSA is an incredible evolution in the security of web services. The modern way of encrypting a web service is with Transport Layer Security (TLS) like what is commonly used in HTTPS. Each side of the connection generates and uses a public/private key pair. One side can encrypt data with the other side’s public key, so only the private key can read it. This works great, but that alone does not provide the user with a way of knowing if the server’s key pair actually belongs to the server. It could have been provided by a snooping third party. The standard solution to this problem is having the certificate signed by a trusted Certificate Authority (CA). All CAs have strict operating requirements which usually prevent them from issuing signed certificates to anyone other than the party responsible for the domain. In a perfect world, this would be more than enough. In the real world, some CAs have been breached and a method of augmenting or replacing CAs has been devised.

This is where DANE with TLSA comes in. TLSA provides a standard way of distributing the hash of a server’s public key with a DNS Resource Record (RR). One fun fact from the standards document: “‘TLSA’ does not stand for anything; it is just the name of the RR type.” With it, any device can verify that a public/private key pair is indeed the certificate the administrators of that particular server wish to use. It is unrealistic to abruptly replace the use of CAs with TLSA though… after all, most modern web browsers will warn users if the website they visit uses a self-signed key instead of one from a valid CA. For forward-thinking web hosts, a hybrid approach might be best. Get a key pair signed by a recognized CA, but also use TLSA to protect against malicious CAs.

A favorite CA of mine is Let’s Encrypt, which I’ve written about before.  Their mission is to reduce the barriers to encrypting every website by providing free certificates. They also provide a tool to automate the process of certificate renewal, but that tool generates a whole new key pair each time. This complicates a TLSA setup, because DNS records need to be updated in advance of a key pair change.

The anatomy of a TLSA record

Like many Internet standards, TLSA records are very simple, but not necessarily easy. The TLSA RR for a service at example.com will be published at _<portnumber>._<protocol>.example.com. and have these additional main components:

  • Certificate usage
    This determines which feature of the certificate the TLSA record is supposed to match against. It can be 0 for “CA restraint,” 1 for “Service certificate restraint,” 2 for “Trust anchor assertion,” or 3 for Domain issued certificate)
  • Selector
    The choice is between 0 to match against the whole certificate or 1 to match against just the public key.
  • Matching type
    This is either 0 to use the use the raw certificate, 1 to use the sha256 hash of the certificate, or 2 to use the sha512 has of the certificate.
  • Certificate association data
    This is whatever data has been described by the three previous values.

For our purposes, we will use certificate usage 3 (Domain issued certificate), selector 1 (public key only), and matching type 1 (sha256 hash). You can read more about the meaning of those values in the RFC if you wish. These values will allow us to make a TLSA record that matches against the public key associated with the persistent key signing request. We could match against Let’s Encrypt’s signing certificate, but they might switch that at any time without warning. If they do switch it, some of your web service’s visitors would be unable to connect to your service.

An example of a TLSA record for the IETF (shamelessly copied from the Wikipedia) looks like this:

_443._tcp.www.ietf.org. TLSA 3 1 1 0C72AC70B745AC19998811B131D662C9AC69DBDBE7CB23E5B514B56664C5D3D6

If you have a managed DNS provider, all you need is the _443._tcp. part (use it like a hostname) along with the part after TLSA (that’s the record). Take a look at this screenshot to see what a TLSA record looks like in Google DNS. Obviously yours will be different, but we’ll look at generating them later. First we need to see what it takes to get Let’s Encrypt to reuse a key pair.

Convincing Let’s Encrypt to reuse a key pair

This is actually quite simple. Let’s Encrypt has a standard command line tool called Certbot which will automatically generate certificates and handle key signing for you. It also has a command line option --csr for reusing a certificate request (which is linked to a single keypair). Unfortunately, that option can only be used in “certonly” mode.

  --csr CSR             Path to a Certificate Signing Request (CSR) in DER or
                        PEM format. Currently --csr only works with the

                        'certonly' subcommand. (default: None)

This is a problem because certificate renewals are normally handled by the command certbot renew and is called by the crontab. Using --csr breaks this feature. If you want to use persistent key pairs, you’ll have to organize and manage the renewal of certificates on your own. I’ve created a set of bash scripts which do this in a four-step process, and you can take a look at them on Github. I’ll summarize the main commands here (don’t forget to replace “example.com” with your real domain):

  1. Generate the key pair and certificate signing request. This creates request.csr and privkey.pem
    openssl req \
      -config <(printf "[req]\ndistinguished_name=req_dn\n[req_dn]\ncommonName=example.com\n[san]\nsubjectAltName=DNS:example.com,DNS:www.example.com") \
      -new -nodes -subj '/' -reqexts SAN \
      -out request.csr \
      -keyout privkey.pem \
      -newkey rsa:4096 \
      -outform DER
    
  2. Request a signed certificate from Let’s Encrypt. This uses request.csr and creates fullchain.pem, chain.pem, and cert.pem. It also expects your example.com domain to be served at /var/www/html so change it if you use a different webroot.
    certbot certonly \
      --webroot \
      --csr request.csr \
      --preferred-challenges http-01 \
      -w /var/www/html \
      --fullchain-path fullchain.pem \
      --chain-path chain.pem \
      --cert-path cert.pem
  3. Calculate the hash for this certificate and publish it to the appropriate DNS record name. The command below prints the record to the terminal. You must update your DNS to include both your current TLSA record (if any) and your new one. Otherwise, there will be a period of time when visitors may receive an error because they received a certificate which doesn’t match the TLSA record.
    cat <<EOF
    _443._tcp.example.com. IN TLSA 3 1 1 $(openssl x509 -in cert.pem -noout -pubkey |
            openssl pkey -pubin -outform DER |
            openssl dgst -sha256 -binary |
            hexdump -ve '/1 "%02x"')
    EOF
    
  4. Install the newly signed certificate and reload your web service. Unfortunately, there isn’t a one-size-fits-all snippet I can provide you, but be sure to wait until the new TLSA record propogates through your network. If you have been using certbot, you could point the symlinks in /etc/letsencrypt/live/example.com to the files you created in the previous three steps. Otherwise, configure your web server to read from their current location.

Automate it

At this point, if you followed the steps in the previous section, you should have a valid certificate to use with Postfix, Apache2, or Nginx but it will expire in three months unless you renew it. If you don’t want to have to update your TLSA record with your DNS provider at that point, you can renew using your existing key pair by repeating steps 2 through 4. When you decide you want to regenerate they key pair (for whatever reason) you can repeat steps 1 through 3 and publish the new TLSA record along with the old one. Then wait about two times the record’s TTL value before completing step 4. If you aren’t sure what your record’s TTL value is, just wait two days. That should be safe enough.

I hope this helps you too. If it does, please share it.
Share

Clear your Postfix email queue in Ubuntu

While you’re configuring a new email server with Postfix, you might run across a situation where your Postfix email queue has invalid emails waiting for delivery. Maybe you changed some settings and got some test emails stuck in limbo, or some external dependency changed on you. Regardless of the cause, you can clear out dead emails if you want your server to stop attempting to deliver the emails which are already queued up. It should be easy, but I ran into some advice which didn’t apply to my server. First, some places advise flushing the queue like this:

postfix -f

But flushing the queue would just force your server to attempt delivery again. Other places recommend this command to delete all emails in the queue:

postfix -d ALL

This looks like what we need, so I tried executing it on my new email server:

$ sudo postfix -d ALL
postfix: invalid option -- 'd'
postfix: fatal: usage: postfix [-c config_dir] [-Dv] command

Uh oh! What happened here? That command shows up whenever I search the web for how to delete the Postfix email queue, so why isn’t it working? Well it turns out that the proper command in Ubuntu (and perhaps other distributions) is postsuper, not postfix. That one change fixes the problem and behaves as expected:

sudo postsuper -d ALL

Problem solved! Now if only it was as easy to convince Microsoft to trust the emails coming from my server…

I hope this helps you too. If it does, please share it.
Share

Update your address for Certbot reminder emails

Certbot is a great tool for automating HTTPS certificate requests and renewals from Let’s Encrypt. The first time you use Certbot on a server, it asks you to submit your email address. After that, your address is saved and Certbot doesn’t ask anymore. Let’s Encrypt then uses your address to send you a reminder when certificate nears its expiration date. Usually your Certbot installation will automatically renew the certificate before then, but things sometimes break. You might accidentally let your certificate expire if you aren’t watching closely enough and don’t receive the email. Without Certbot reminder emails, a lot of websites would break.

Some recent restructuring I’ve been doing on my own servers made me realize I’d rather get Certbot reminder emails sent to a different address than the one I used during that first run. Certbot renewals are automated in Ubuntu, but I don’t like surprises. I want the reminders going to an administrative email associated with the domain name so I can notice problems before they become critical. I looked around the Certbot help screen for a command to update it, but I didn’t see anything obvious. Then I did a quick web search and found some bug report / feature requests for it where I eventually came across this Github issue page with the answer described by @bmw.

The Code

certbot register --update-registration --email <email>

It’s that simple. Problem solved! That was quick. Now I’m off to mess with some DMARC reports.

I hope this helps you too. If it does, please share it.
Share

Certbot-auto 0.21.1 installation and usage on Linux

UPDATE: The Ubuntu repository appears to have updated to the latest version of certbot, but this process can be used on almost any distribution of Linux when your repository is outdated and you want the latest version of certbot-auto.

Let’s Encrypt recently disabled an HTTPS certificate challenge method which was in popular use. The other challenge methods still work fine, but anyone using TLS-SNI-01 with certbot had to make a change. The challenge was detailed on Github. Thankfully, the developers of certbot have already released a new version which deals with the problem. Now it is a matter of time before the Ubuntu repository gets updated, but in the meantime people who need the latest version of certbot are being told to use certbot-auto to install it. One person in particular was struggling, so I made a video of the process in Ubuntu 14.04, which is the OS they were using on their server. The process is really about the same for any Linux server running Nginx, but I wanted to make sure the advice I gave was solid. You can watch the video here, and read the process described below.

For this demonstration of certbot-auto, the target domains are certbot.flippingbinary.com and www.certbot.flippingbinary.com. NOTE: These domains have been deleted and are no longer valid.

Video

Prerequisites

This process will work for installing certbot-auto on most distributions of Linux with either an Nginx or Apache web server. The specific example described in this post uses Ubuntu 14.04.5 and Nginx 1.4.6.

Configuration

I had trouble using the default install of nginx because certbot complained about duplicate listen statements. I believe that may be because the domain names I was using weren’t explicitly named in the configuration. Regardless, I went ahead and created a basic virtual host configuration file in /etc/nginx/sites-enabled/certbot.flippingbinary.com with this text:

server {
  server_name certbot.flippingbinary.com www.certbot.flippingbinary.com;

  listen 80;
  listen [::]:80;

  root /usr/share/nginx/html;

  index index.html index.htm index.nginx-debian.html;

  location / {
    try_files $uri $uri/ =404;
  }
  location = /favicon.ico { log_not_found off; access_log off; }
  location = /robots.txt { log_not_found off; access_log off; allow all; }
  location ~* \.(css|gif|ico|jpeg|jpg|js|png)$ {
    expires max;
    log_not_found off;
  }
  location ~ /\.ht {
    deny all;
  }
}


Check Your Configuration

The most frustrating problems are the ones that are obvious only after you solve them, so I like to make a habit of doing sanity checks even when I’m sure everything is working properly.

First make have nginx check for configuration errors:

sudo nginx -t

Then make sure actually nginx answers at each domain. Ideally you should check from a computer on a different network and with a different DNS server than your server.

wget --spider http://certbot.flippingbinary.com

Most people want to also encrypt a www. subdomain even if they ultimately redirect visitors away from it, so check both.

wget --spider http://www.certbot.flippingbinary.com

Prepare certbot-auto

Download certbot-auto using any method you choose, such as with wget because it is installed in Ubuntu by default:

wget https://dl.eff.org/certbot-auto

Enable the executable permission:

chmod a+x ./certbot-auto

Request the certificate

Finally, run certbot-auto with same arguments you would with certbot. You can replace --nginx with --apache if you are using apache.

sudo ./certbot-auto --nginx -d certbot.flippingbinary.com,www.certbot.flippingbinary.com

Further reading

If you’re curious what the different certbot arguments are, take a look at the help screen

certbot-auto [SUBCOMMAND] [options] [-d DOMAIN] [-d DOMAIN] ...

Certbot can obtain and install HTTPS/TLS/SSL certificates. By default,
it will attempt to use a webserver both for obtaining and installing the
certificate. The most common SUBCOMMANDS and flags are:

obtain, install, and renew certificates:
(default) run Obtain & install a certificate in your current webserver
certonly Obtain or renew a certificate, but do not install it
renew Renew all previously obtained certificates that are near
expiry
-d DOMAINS Comma-separated list of domains to obtain a certificate for

--apache Use the Apache plugin for authentication & installation
--standalone Run a standalone webserver for authentication
--nginx Use the Nginx plugin for authentication & installation
--webroot Place files in a server's webroot folder for authentication
--manual Obtain certificates interactively, or using shell script
hooks

-n Run non-interactively
--test-cert Obtain a test certificate from a staging server
--dry-run Test "renew" or "certonly" without saving any certificates
to disk

manage certificates:
certificates Display information about certificates you have from Certbot
revoke Revoke a certificate (supply --cert-path)
delete Delete a certificate

manage your account with Let's Encrypt:
register Create a Let's Encrypt ACME account
--agree-tos Agree to the ACME server's Subscriber Agreement
-m EMAIL Email address for important account notifications

More detailed help:

-h, --help [TOPIC] print this message, or detailed help on a topic;
the available TOPICS are:

all, automation, commands, paths, security, testing, or any of the
subcommands or plugins (certonly, renew, install, register, nginx,
apache, standalone, webroot, etc.)


I hope this helps you too. If it does, please share it.
Share